Warehouse Layout Optimization: A Step-by-Step Planning Guide
27th Jan 2026

An optimized warehouse layout reduces travel time, improves picking accuracy, increases throughput, and enhances safety. Whether you’re redesigning an existing facility or planning a new one, a structured approach to layout planning helps ensure every square foot works harder for your operation.
This guide walks through aisles, picking zones, staging areas, and safety pathways—with practical steps you can apply immediately.
Step 1: Map Your Current Operation (or Planned Workflow)
Before moving racks or buying equipment, document how work actually flows.
What to capture
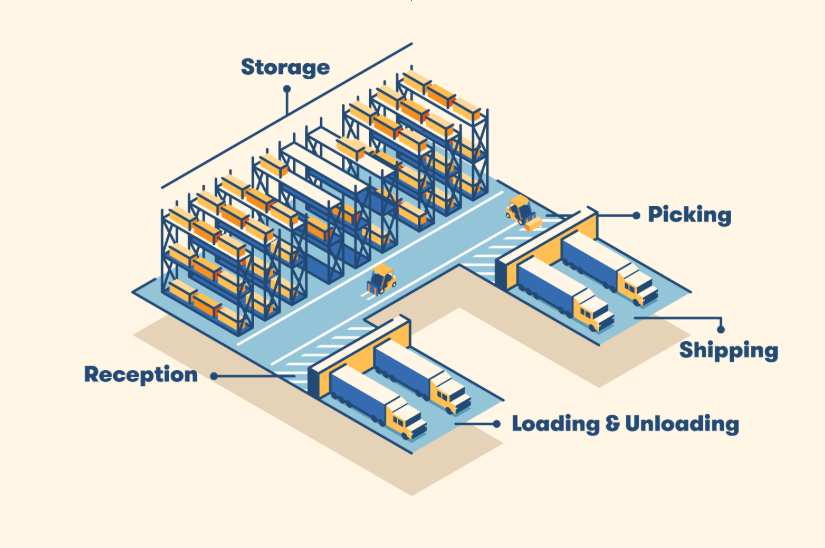
- Receiving → storage → picking → packing → shipping
- Order profiles (small parts vs. pallets, case pick vs. each pick)
- Daily/seasonal volume spikes
- Equipment used (forklifts, carts, conveyors)
Outcome: A clear baseline that exposes bottlenecks, excess travel, and congestion points.
Step 2: Design Aisles for Flow and Equipment
Aisles are the warehouse’s highways. Their width and direction directly affect speed and safety.
Best practices
- Match aisle width to equipment (reach trucks, counterbalance forklifts, carts)
- Use one-way aisles in high-traffic zones to reduce conflicts
- Keep cross-aisles strategic to shorten pick paths
- Avoid dead ends where turning or backing increases risk
Tip: Narrow aisles boost storage density—but only if your equipment and pick rates can support them.
Step 3: Create Smart Picking Zones
Zoning minimizes travel and balances labor.
Common picking zones
- Fast movers (A-items): Closest to packing/shipping
- Medium movers (B-items): Central storage
- Slow movers (C-items): Higher or farther locations
- Specialty zones: Hazmat, oversized items, temperature-controlled goods
Optimization ideas
- Batch or wave pick within zones
- Assign dedicated pickers to high-velocity areas
- Use flow rack or carton flow for FIFO items
Step 4: Plan Efficient Staging Areas
Staging is where orders pause—briefly—before their next move. Poor staging causes backups and errors.
Receiving staging
- Allocate space for inspection, labeling, and put-away
- Keep clear separation between inbound and outbound
Shipping staging
- Size staging lanes by carrier and route
- Clearly label lanes to prevent mis-ships
- Position near dock doors to reduce handling
Rule of thumb: Size staging for peak days, not averages.
Step 5: Separate Pedestrian and Equipment Traffic
Safety pathways aren’t optional—they’re productivity enablers.
Key elements
- Painted floor markings for walkways
- Guardrails or bollards at crossings
- Clearly marked forklift routes
- Mirrors at blind corners
Result: Fewer near-misses, smoother flow, and better compliance.
Step 6: Optimize Vertical Space (Safely)
If you’re out of floor space, look up.
Options
- Taller racking systems
- Mezzanines for light picking or packing
- Vertical storage for long or bulky items
Access matters
- Use appropriate ladders or industrial stairways
- Ensure guardrails and load ratings meet safety standards
Step 7: Test, Measure, and Adjust
Layout optimization is iterative.
Track KPIs
- Pick rate (lines/hour)
- Travel distance per order
- Dock-to-stock time
- Order accuracy
- Incident reports
Run small pilots, gather feedback, and refine. Even minor layout tweaks can deliver major gains.
Common Layout Mistakes to Avoid
- Designing for storage density instead of flow
- Ignoring future growth or seasonal surges
- Overcrowded staging areas
- Mixing pedestrian and forklift traffic
- Underestimating aisle turning requirements
Putting It All Together
A well-planned warehouse layout:
- Reduces travel and handling
- Improves order accuracy
- Enhances safety
- Scales with growth
Start with workflow, design aisles for movement, zone your picking intelligently, stage with intention, and protect people with clear pathways.
Need Help Optimizing Your Layout?
Material Flow provides storage systems, racks, carts, safety equipment, and material-handling solutions to help warehouses design layouts that work smarter—not harder.